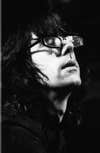
Tech-Info-Canon-D30-ISO-800-85mm-f-1.8-1-125-se
*Tech Info: *Canon D30 ISO 800 85mm f/1.8 1/125 sec f/1.8*Venue: *An Taibhearc*Notes: *The Cellist of The Tycho Brahe looking towards the rest of the band between songs, and the eyes grabbed me.
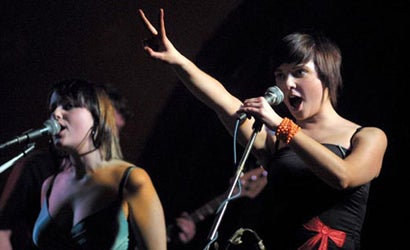
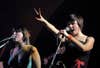
Tech-Info-Canon-D30-ISO-400-85mm-1.8-1-125-sec
*Tech Info: *Canon D30 ISO 400 85mm 1.8 1/125 sec f/2*Venue: *The Warwick*Notes: *A great moment of the singers of The Chalets, which was used extensively by band and press.
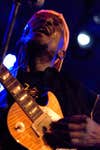
Tech-Info-Canon-10D-ISO-1600-85mm-f-1.8-1-100-s
*Tech Info: *Canon 10D ISO 1600 85mm f/1.8 1/100 sec f/2.2*Venue: *Roisin Dubh*Notes: *Jimmy Cliff isreally getting in his guitar playing. Luckily he is in the light and not blocked by the mic.
Tech-Info-Canon-10D-ISO-1600-85mm-f-1.8-1-125-s
*Tech Info: *Canon 10D ISO 1600 85mm f/1.8 1/125 sec f/2.2*Venue: *Roisin Dubh*Notes: *The backing singer for Jimmy Cliff giving it all she has. This photo works well on it’s own or complementing the photo of Jimmy Cliff himself.
Tech-Info-Canon-D30-ISO-800-50mm-f-1.8-1-50-sec
*Tech Info: *Canon D30 ISO 800 50mm f/1.8 1/50 sec f/1.8*Venue: *Roisin Dubh*Notes: *The Handsome Family had a nice bit of banter between them on stage and this shot captures an funny look she’s giving him, which is added to by the composition.
Tech-Info-Canon-A2-85mm-f-1.8-Fuji-Neopan-1600
*Tech Info: *Canon A2 85mm f/1.8 Fuji Neopan 1600 1/200 sec f/2*Venue: *The Warwick*Notes: *An unusual composition for the unusual band The Jimmy Cake which was used to accompany an article in The Irish Times, national paper of Ireland.
Tech-Info-Canon-A2-85mm-f-1.8-Fuji-Neopan-1600
*Tech Info: *Canon A2 85mm f/1.8 Fuji Neopan 1600 1/200 sec f/2*Venue: *The Warwick*Notes: *Noticing early on how the accordionist moved, I watched for the most dramatic moment and was able to capture him as the spotlight caught the side of his face.
Tech-Info-Canon-A2-85mm-f-1.8-Fuji-Neopan-1600
*Tech Info: *Canon A2 85mm f/1.8 Fuji Neopan 1600 1/200 sec f/2*Venue: *The Warwick*Notes: *The keyboard player was right next to me so this is a portrait of a man lost in his music.
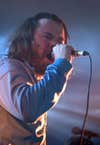
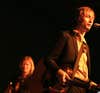
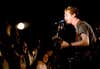
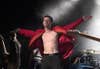
Tech-Info-Canon-10D-ISO-800-85mm-f-1.8-1-125-se
*Tech Info: *Canon 10D ISO 800 85mm f/1.8 1/125 sec f/2.0*Venue: *The Warwick*Notes: *Capturing the singer of The Republic of Loose’s singer off center shows off more of his intense expression. The light and the sharpness of the eyes adds to the drama of this photo.
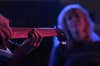
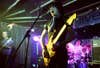
Tech-Info-Canon-10D-ISO-800-85mm-1.8-1-125-sec
*Tech Info: *Canon 10D ISO 800 85mm 1.8 1/125 sec f/2.0*Venue: *The Roisin Dubh*Notes: *Shooting Mirakil Whip this close with a long lens allowed for unique composition using shallow depth of field.
Tech-Info-Canon-10D-ISO-400-85mm-1.8-1-125-sec
*Tech Info: *Canon 10D ISO 400 85mm 1.8 1/125 sec f2.0*Venue: *Radisson SAS Galway Ballroom*Notes: *A warm shot of Neil Hannon of The Divine Comedy speaking to the audience which is enhanced by his fiddle player looking on from the background.
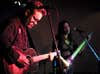
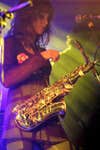
Tech-Info-Konica-Hexar-35mm-f-2-Fuji-800-Press
*Tech Info: *Konica Hexar 35mm f/2 Fuji 800 Press with 80B filter 1/80 sec f/2.2*Venue: *CubaLive*Notes: *I was able to capture all members of the three piece Petronella as the guitarist screams into the microphone by shooting from stage left.
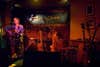
Tech-Info-Canon-10D-ISO-800-20-35mm-1-15-sec-f
*Tech Info: *Canon 10D ISO 800 20-35mm 1/15 sec f/4.5*Venue: *Roisin Dubh*Notes: *Martha Tilston, the opening act for Hem (those are their instruments on the stage), which I chose to take wide to take advantage of all those stringed instruments.
Tech-Info-Konica-Hexar-35mm-f2-Fuji-800-Press-w
*Tech Info: *Konica Hexar 35mm f2 Fuji 800 Press with 80B filter 1/100 sec f/2*Venue: *CubaLive*Notes: *Shooting from far stage right I was able to get the fans really enjoying Glen Hansard.
Tech-Info-Canon-10D-ISO-800-50mm-f-1.8-1-125-se
*Tech Info: *Canon 10D ISO 800 50mm f/1.8 1/125 sec f/2.5*Venue: *Radission SAS Galway main room*Notes: *Taken right as The Toasted Heretic finished their final encore, this photo captures a dramatic and unusual pose by an obviously interesting performer.
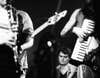
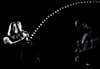
Tech-Info-Canon-A2-Fuji-Neopan-1600-85mm-f-1.8
*Tech Info: *Canon A2 Fuji Neopan 1600 85mm f/1.8 1/100 sec f/ 2.2*Venue: *The Warwick*Notes: *Subtle moments between songs can often be great moments, and the stage lights like a string of pearls both frame the guitarist in shadow and lead the eye to the singer.
Tech-Info-Canon-10D-ISO-800-50mm-f1.8-1-100-sec
*Tech Info: *Canon 10D ISO 800 50mm f1.8 1/100 sec f2.2*Venue: *Roisin Dubh*Notes: *One of the best moments of this concert by ska legends The Selecter, which was captured by hearing a build-up in the music.
Tech-Info-Canon-10D-ISO-800-85mm-f-1.8-1-160-se
*Tech Info: *Canon 10D ISO 800 85mm f/1.8 1/160 sec f/2.2*Venue: *The Warwick*Notes: *Of all the photos I took of The Zutons this night, I prefer this one for the subtle and dignified pose combined with the dramatic light.