How To Make The Most Of Your Fall Photography
Capture the most brief and beautiful time of year

Filled with reds, golds, and oranges, autumn is a spectacular time to photograph. Leaves turn and drop from trees, berries ripen, and morning dew clings to everything as summer’s heat wanes. To tell the story of the changing seasons, get creative with color, motion, and perspective—and don’t forget to look for details.
Find Your View
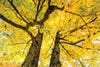
To truly capture the beauty of autumn, try shifting your perspective. For instance, if you’re deep in a forest, turn your camera straight up with a wide-angle lens for a dizzying view. This works best on a sunny day, when the sun is high overhead and the translucent leaves seem to glow from within when backlit. The stronger the light, the better the effect. Keep them from becoming overexposed by checking your histogram.
To create an eye-catching point of interest try including the sun in your composition and add a starburst effect. Use a wide-angle lens set to a small aperture such as f/11 or f/16; the smaller the aperture, the more pronounced the effect. To reduce lens flare when shooting directly at the sun, block part of it with a tree trunk or branch. Don’t block the sun completely, though; you need just enough to create a strong burst.
Telephoto zoom lenses, such as a 70–200mm, are perfect for fall scenes. They allow you to home in on important details and take advantage of telephoto compression, which is an optical illusion that appears to flatten perspective in a distant scene. Use telephoto zooms to isolate a particularly colorful section of scenery or to photograph a distant hillside alive with color. Use one for still life and detail shots, too, such as photos of dew or frost-covered leaves carpeting the forest floor.
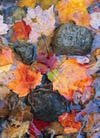
When shooting leaves on the ground, align your camera plane parallel to the subject plane to minimize the depth of field you need to ensure sharp focus. Stop down and use a small aperture, such as f/16, to get corner-to-corner sharpness.
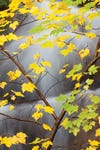
For colorful leaves still hanging from the branches, zoom in tight to isolate the leaves from the background. On a still day when no breeze stirs the leaves, juxtapose them against water rushing over rocks in a stream and use a long exposure to blur the motion of the water.
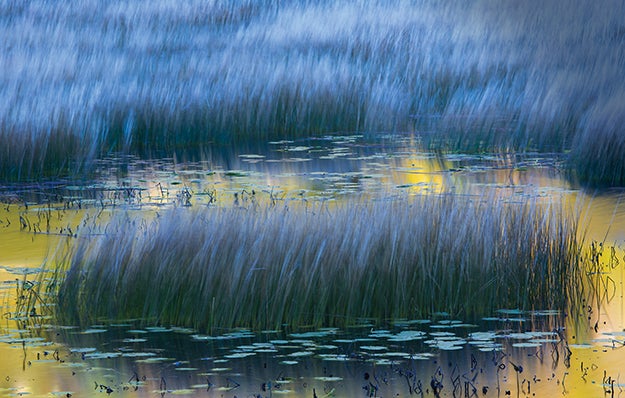
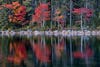
Get Reflections Don’t just look for color in the trees—look for reflected color. Still water is great for capturing reflections of foliage; you can even include rocks, logs, or other elements to break up the reflection and make the composition more interesting. Use a telephoto zoom to get in tight on the most colorful reflections you find. For more impressionistic results, shoot moving water. Images using reflections work best when the foliage is brightly sunlit and the water is in shadow. This also creates an interesting color contrast between the warmth of sunlit foliage and the cool of anything in the shade, which mirrors the blue sky above. Just make sure to select a white balance that preserves the blue tones in shaded areas; typically, the daylight setting or slightly cooler will give you a good balance between the cool and warm tones. If you are shooting RAW, you can make your white balance selection when processing the file later at your computer.

Work That Polarizer A polarizing filter, affixed to your lens, can be an essential tool for capturing fall foliage—if you use it properly. Your instinct may be to use one to darken blue skies or increase the contrast of clouds, but on a sunny day, especially with a wide-angle lens, the polarizing effect will often be uneven, making one side of the sky look darker than the other. Check your LCD: If you get uneven polarization of the sky, take the polarizer off and darken the sky and add contrast in postproduction. The best time to use a polarizer? In overcast light, especially after a soaking rain. Leaves have waxy coatings that are prone to glare, and wetness intensifies that. But a polarizer cuts through glare, revealing stunning color beneath. Turn the polarizer until you see the colors darken and strengthen. A polarizer is also essential for photographing streams and waterfalls to darken wet rocks and enhance the overall color and contrast in your images. When using a polarizer, just remember that you can lose up to two stops of light. Watch for motion in the trees—even a slight breeze can blur the moving leaves during a long exposure. To freeze motion, set a higher ISO and, if maximum depth of field is not critical, use a larger aperture to let in more light so you can set a faster shutter speed.

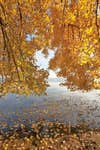
Capture Peak Color It’s easy to be in the right place at the right time for peak fall foliage: Do a web search for “foliage reports” to find national, regional, and even local resources to help you to monitor the changing leaves. Fall color rarely happens all at once in any given location. Different species change color at different times, and higher elevations change faster than lower ones. Focus your efforts on areas where foliage is at its most intense and diverse. Remember that plenty of plants other than trees take on autumn hues, such as ferns, blueberry bushes, and ground plants. A diverse mix of tree and plant species will help you create interesting color profiles. A few evergreens mixed in with some maple trees can create a pleasing mix of greens and reds. With a little exploring, you should be able to find a partial spectrum of colors including reds, oranges, yellows, browns, and even purples. After peak color fades and most of the leaves have dropped, there’s still time to make great autumn images. I enjoy making photos when the trees are bare and the forest floor (or stream and waterfall scenes) is carpeted with leaves. They retain their color for some time after falling, allowing you to extend your autumn photography even as the chill of winter begins to set in.
About the Author/photographer: Ian Plant is a Pop Photo contributing editor and author of the photography how-to eBook Essential, free from ianplant.com.