How-To: Bring Out Freckles In a Portrait Photo Using Photoshop or Lightroom
A simple image editing trick can reveal freckles you didn't even know you had

I have been a relatively freckly person for my entire life. Now, I have passed that trait onto my daughter. I never liked my own freckles, but hers seem downright adorable, so I recently posted a photo of her on social media using a technique that emphasizes those little reddish brown dots she has around her nose and several folks asked me how I did it. Here’s how.
The answer actually goes back to an old film photography technique. When you’re shooting black-and-white film, you could put different colored filters over the front of the lens and it could drastically change the appearance of the resulting photo.
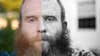
The blue filter would block out a great deal of the red light. As a result, the red tones in the skin would appear darker. When you emulate the same thing in software, it darkens the reds and emphasizes the freckles. That’s also why my eyes, which are blue, appear lighter.
The filter settings in software can’t quite achieve the same results as true colored glass filters and black-and-white film, but they do give you an approximation and for something like this, that’s all we really need.
The techniques work with other things, too. For instance, if you want to darken up a blue sky in a black and white image, a red filter will do nicely.
As noted in the video, though, this isn’t always the most flattering technique. If someone has sun damage to their skin or blemishes of any kind, really, they’re emphasized using this editing trick. So, don’t go doing it to everyone’s selfies on Facebook and posting them without their permission.
