An Introduction to Macro Photography
Getting started with extreme close-up photography
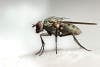
fly
“Macro Photography provides shooters with the opportunity to explore a very unfamiliar world which is often beautiful, strange, and always interesting,” says Brian Valentine, the British photographer who captured the eye-popping Muscid fly shown above.
One intriguing aspect of Valentine’s hundreds of close-ups is their environs. “I took virtually all of [them] in my own garden,” says the retired microbiologist. “It provides year-round opportunities, from bugs to flowers to raindrops to frost or snow.”
Macro photography’s challenges will test your photographic skills, including focusing, composing, lighting, and dealing with shallow depths-of-field. Master the challenges and this invisible world will reveal all its mysterious beauty.
Ways to Get Close
Photographic tools that can help you achieve subject-revealing magnifications of 1:1 or greater are profiled in our gallery, but before you spring for costly equipment, consider less expensive options. For example, Marianna Armata, the Canadian who shot the tulip petals uses an inexpensive Pixco M42-M4/3 adapter ($35, street) to mount an older manual-focus, manual-aperture Asahi Pentax 50mm f/4 Macro Takumar lens ($140, street) on her Panasonic Lumix GH1. It’s the rig she used for those petals. “I honestly love my old gear,” she says. “The lens is very smooth and easy to operate, and [I like] that the manual focus and manual aperture rings give me full control of every shot I take.”
Another cost-saving option for macro novices: starting out with a close-focusing compact. You can learn many of the macro basics with cameras like the Canon PowerShot SX50 HS ($399, street), Nikon Coolpix P600 ($497, street), or Panasonic Lumix DMC-ZS40 ($398, street), all of which offer close-focusing from 0.5 to 2 inches, and close-up-friendly features like self-timers, manual focus, and macro modes.
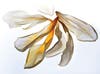
Marianna Armata shot these tulip petals with a Panasonic Lumix GH1 adapted with a manually focusing Pentax macro lens. Photo: Marianna Armata
{C}{C}{C}
Focusing Ins and Outs
With close-ups, the more you magnify your subject, the more you magnify any flaws of its capture—like defocus. Softness in a minimally magnified subject, say 1:40, might not be objectionable, but as you get in closer to 1:4, that same degree of softness becomes unacceptable. It happens so often in close-ups because of the extremely shallow depths of field produced by high subject magnification. As it approaches 1:1, where the image of the subject and the subject itself are identical in size, even at small apertures, only a small sliver of that subject will be sharp. Placement of that sliver is too critical to rely on a mechanical AF system to consistently get it right.
How do you deal with this? Despite today’s crazy-good AF systems, stick to manual focus for close-ups. Accurately placing the zone of sharpness requires manual focus and what Brian Valentine calls the best macro tool known to mankind: your eyes. The two most common techniques are manually focusing via the lens’ focusing ring, and fixing the manual focus ring, and carefully moving the entire camera to put the sharpness where you need it—a macro focusing rail can help with this.
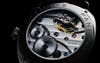
Teru Onishi made this shot of watch innards with a Sinar P2 large-format camera, Phase One P45 digital back, and 90mm APO Sironar lens. He lit the watch with a single Broncolor Scoro strobe. Photo: Teru Onishi
If you’re new to macro photography, there is an almost surefire way to achieve sharp focus. Canadian Marianna Armata used it for her tulip petals: Stick with flat subjects that can be captured sharply even with shallow depths-of-focus. “I had no trouble keeping the petals sharp because they were relatively flat, shot on a flat surface, indoors [with no wind], and my camera was firmly anchored to a tripod,” says Armada. Your take-away here? At least in the beginning, try to control as many focus-busting variables as you can.
For three-dimensional subjects, today’s digital image apps offer new ways of achieving sharpness in macro subjects from front to back. One of the most popular is “focus stacking.” To do this, take multiple images of a stationary subject at different focusing depths in your camera’s manual focus mode. Make the focus shifts tiny, and if your lens has one, use its depth-of-field scale as a guide for how much to shift focus for the working aperture. Every area that you want sharp in the final composite should be sharply captured in at least one of these exposures. For best results, keep the lens-to-subject distance the same for each to assure no apparent perspective distortion.
You can manually import the exposures as layers into a single image file, and mask out the soft areas of each layer to ultimately render the entire subject sharp. Specialized focus-stacking programs like Helicon Focus and Zerene Stacker do this automatically and are your most convenient choice, with prices ranging from $30 to $298 (direct), depending on the features.
{C}{C}{C}
Getting Light Right
The good news about macro lighting? Sunlight, direct or softened by a thin cover of clouds or a diffusion panel, can be perfect. If you’re just beginning in macro, use the sun to learn the basics of focus, composing, and steadying your camera, and leave the cost and complex techniques of specialized macro lighting for later.
“Natural light works well for subject magnifications up until lifesize, 1:1 subject magnifications,” says Valentine. “At magnifications greater than 1:1, it can be tricky. I use natural light where I can for flowers and larger insects such as butterflies and dragonflies. I prefer slightly cloudy days, because their light is softer, and doesn’t give you the high contrast and garish specular highlights of full sunlight.” Natural light is especially good for tiny critters who can get spooked by a popping flash. A bevy of simple white reflecting cards can direct the light where it’s needed.
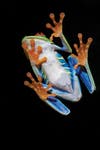
Red Eyed Tree Frog, Costa Rica
Paul Souders captured this red-eyed tree frog in a terrarium at a Costa Rican frog museum. He shot with a Canon 1Ds Mark III and 150mm f/2.8 Sigma macro lens, with an exposure of 1/4 sec at f/11, ISO 400. Photo: Paul Souders/World Foto
When you’ve mastered natural light for your close-ups, try exploring more specialized, flash-based macro-lighting systems. Closer and more easily aimed than the sun, camera-mounted macro flashes are very bright, allowing you to set the small apertures that deliver deep depths-of-field and sharp subjects. As mentioned, because close-focusing macro lenses produce very shallow depths-of-field, the use of smaller midrange apertures can be a godsend when used with bounced or diffused flashes. Another perk: Flashes used at low power settings have lightning-like flash durations that can keep a wind-blown flower, skittish insect, or hopping toad sharp. Speaking of skittish insects, Valentine recommends setting your macro flashes to the manual mode, because a TTL pre-flash can send your subject into flight before the shutter has had a chance to open.
Macro flash options include ring lights or small flashes (manual or TTL), mounted on a macro flash bracket like the Manfrotto 330B ($60, street) or Novoflex Uniset ($227, street). The brackets hold the flashes on each side of the lens, and they offer multiple advantages over macro ring lights. Slightly dialing up the power on one side can add subtle shading and shaping to your subjects. You can diffuse or tint each flash, aim them from different angles for a directional light, or turn one off for a dramatic side-lit effect.
{C}{C}
Steadying the Camera
Because high-magnification optical systems usually magnify camera shake along with your subject, one of the greatest challenges of close-up photography is keeping the camera steady. Start with a sturdy tripod, preferably one with a horizontally mounting centerpost that will let you aim the camera straight down—great for jewelry and anything else that works best when shot from above. Also look for wide-splaying legs that allow for low, ground-level close-ups of flowers, mushrooms, and insects in the wild. (For such ground-level work, Seattle-based nature pro Paul Souders, who shot the red-eyed tree frog says, “I love shooting with a 90-degree right angle viewfinder attachment. I can place my camera right on the ground and not have to go into gymnastic contortions to view my subjects!”)
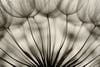
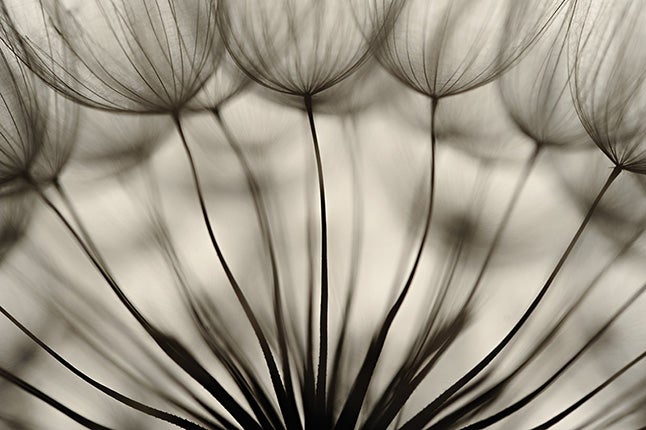
A_gorastos Papatsanis of Thessalonica, Greece photo-graphed this dandelion on Greece’s famous Mount Olympus with a Nikon D700. He plucked half of its seeds to get a direct view into the “heart” of the seed head, and backlit his subject with LED lights. Photo: Agorastos Papatsanis_
Most cameras today have tools for battling camera shake. Use them. The camera’s self-timer will fire the shutter long after you’ve pressed the release, and the camera has settled. Also, mirror lock-up will prevent the camera’s shutter from shaking the sensor in what’s commonly called mirror slap. Another option: A cable release can fire the shutter without jostling the camera.
Need more inspiration? Search for macro images on photo.net, Flickr, and other image-sharing websites. As Valentine notes, when you first start shooting close-ups, simple tasks like focusing are challenging. Once you master them, though, the possibilities expand exponentially until the tiny world you’re exploring will seem vast with visual possibilities.