Camera Test + Video: Lomography Konstruktor 35mm Film SLR
We spent two hours painstakingly putting this DIY camera together, and have a time lapse to prove it
We may earn revenue from the products available on this page and participate in affiliate programs. Learn more ›
When I first found out about Lomography’s Konstruktor DIY camera kit, I was pretty excited. I shoot quite a bit of film, and despite being 25-years-old, I still consider myself to be a total Lego Maniac. So the concept of a build-your-own camera seemed very appealing.
First thing Monday morning, I started work on my Konstruktor with a level of excitment most unusual for the start of a work week. However, more than once throughout the building process I found my excitment turning to frustratation (and at least once, my frustration led to a near mental breakdown), but the final outcome of the process: a very fun and capable film camera, made it all worthwhile.
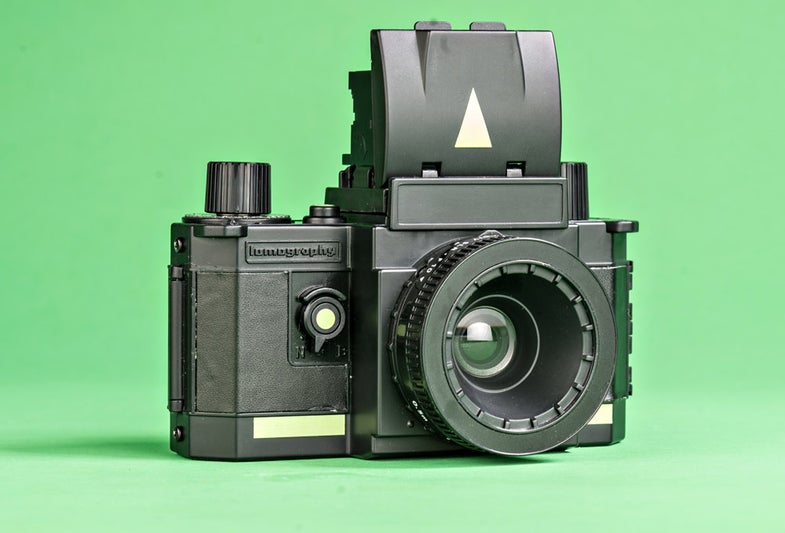
The Konstruktor’s feature list is likely what you’d expect from a Lomo camera. It uses a single-lens reflex vertical viewfinder (that folds completely flat), a surprisingly sharp f/10 50mm lens, a tripod mount and two shooting modes. Still, it’s priced at $35, so you’re not really getting a discount or paying a premium for the task of constructing it.
Construction
It says right on the front of the Konstruktor box,_ “Build your own 35mm SLR camera in 1-2 hours!” _And that much is true. However, that doesn’t take into consideration the six-or-so times I had to partially take it apart over the course of the next few days, just to get everything working smoothly. And to be fair, I had it totally finished in about an hour and a half and was all set to load it up with film when I notice an extra gear lying on the table. Sigh.
The instructions are fairly straight forward
While the build isn’t necessarily easy, it is very straight forward. The diagrams, while at first glance, look totally overwhelming due to the 12 different languages listed, are actually well-written and informative. Anyone over the age of 12 or 13 should have no problem following them.
It wasn’t until I had to connect a tiny spring, piece B9, from piece B24 to piece S2 that I ran into problems. The tiny spring is responsible for the shutter popping back up after a frame is fired. Unfortunately, the 25 minutes I spent monkeying with it seemed to stretch it out beyond its usefulness.
Fortunately, Lomography includes two B9’s, so after an emergency repair the following day, I was back up and running.
Piece B9 before and after being stretched out.
Note: Piece B9 is very very easy to lose. Connecting the spring between the two plastic pins (piece B24 and S2) is not an easy task and can easily result in piece B9 shooting off across the room, never to be found again. Do not lose piece B9.
Lomography also includes faux-leather pieces, in red, white and black, to decorate you Konstruktor, in addition to a bunch of racing-stripe-looking stickers. I originally decked mine out with white leather, but later switched to black. Personal taste.
In the Field
A look inside: The Konstruktor is fairly painless to load
Upon completing the building process, I loaded my Konstruktor up with a roll of Kodak Porta 120 and hit the streets. I’ve had less-than-stellar experiences loading other plastic cameras in the past, but the Konstruktor is surprisingly simple and painless.
The camera itself features a 50mm f/10 lens and can be fired at its default setting of1/80 sec, or bulb mode. I used it along with a light meter app on my iphone to find something that would lend itself to the pre-determined exposure settings.
The Konstruktor is shockingly easy to focus, thanks to the magnfied finder. Advancing the film is a little bit of a guessing game, which lead to some accidental double exposures (in addition to a few done on purpose). But seeing as “happy surprises” are sort of Lomography’s big selling point, I won’t hold it against them.
A word of caution: Be careful with the frame counter. While it’s suppose to countdown with every frame advance, it is very easy to accidentally nudge it off track. After firing the first few frames I decided to ignore it completely.
A lack of lubrication inside the camera makes the moving parts feel stiff. This is especially true for the film rewind. I ended up lubricating a few of the moving parts with some Yoyo lubricant (I’m not sure how I came to own such a product), and found it helped the overall operations of the camera quite a bit. Especially lubricating the shutter mechanism. Just be careful to make sure any lubricant you choose is safe for use on plastic and won’t melt your camera.
Should I Buy It?
Upon hearing about it, this camera comes off as a gimmicky. However, after blowing through a roll and seeing the results, I am impressed. All things considered, the Konstruktor is a very usable and capable film camera. And despite being made of cheap plastic, it actually seems about as durable a Holga, which is to say, it should last you through many rolls of film.
But even if the Konstruktor were a nightmare to shoot with, the process of putting it together and the inevitable understanding of the inner workings of an SLR you get from monkeying with it, definitely make it an awesome product.
At $35, the Konstruktor is a great weekend project, a fun camera to shoot with and a good buy. Grab one here.

Konstruktor #1

Konstruktor #3

Konstruktor #2

Konstruktor #5

Konstruktor #6

Konstruktor #4
