How To: Process and Save RAW Files
Shooting and processing images in RAW allows for more creative freedom.
Unlike JPEGs, which are “cooked,” RAW files contain a ton of data that must be manipulated before you can edit your image and make it small enough to be e-mailed and viewed by family and friends.
Despite the extra work, RAW files are worth it. They let you control white balance, saturation, and contrast as if you were doing so while shooting. Because RAW files utilize lossless compression, you should be able to get better detail and sharpness, without artifacts, when you enlarge them. Finally, you’ll have more of a chance of recovering what seems like lost shadow and highlight detail in your picture.
Here are the basics on how to open, convert, and save your RAW files, from start to finish. These instructions are for Adobe Photoshop CS5, but will work similarly in previous versions and in Elements.
F.Y.I
Most cameras give you the option of shooting RAW+JPG. Doing so is not a bad idea if you have lots of pictures you’ll want to share quickly online. Because RAW files are larger, shooting both uses up memory card and hard drive space faster. Devotees of RAW often opt to forego the JPEGs and instead use a program dedicated to RAW, such as Apple Aperture or Adobe Lightroom, to quickly process their RAW files into JPEGs.
Because RAW files must be converted before you can edit them, opening a RAW file from Adobe Bridge automatically brings up Adobe Camera Raw (ACR), the conversion plug-in that comes with Photoshop. To start the process, simply find your image in Bridge and double-click on it.
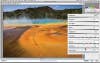
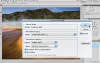
The most important tools for conversion are in the Basic tab of Adobe Camera Raw, which appears by default on the right side of your screen. Adjust the sliders to get the look you want. Start by adjusting Exposure to set the white point and Blacks to set the black point. If you don’t like your image’s white balance, use the pulldown menu to choose a preset or adjust the Temperature and Tint sliders. Then add Clarity for more midtone contrast, and Vibrance if you want more intense colors.
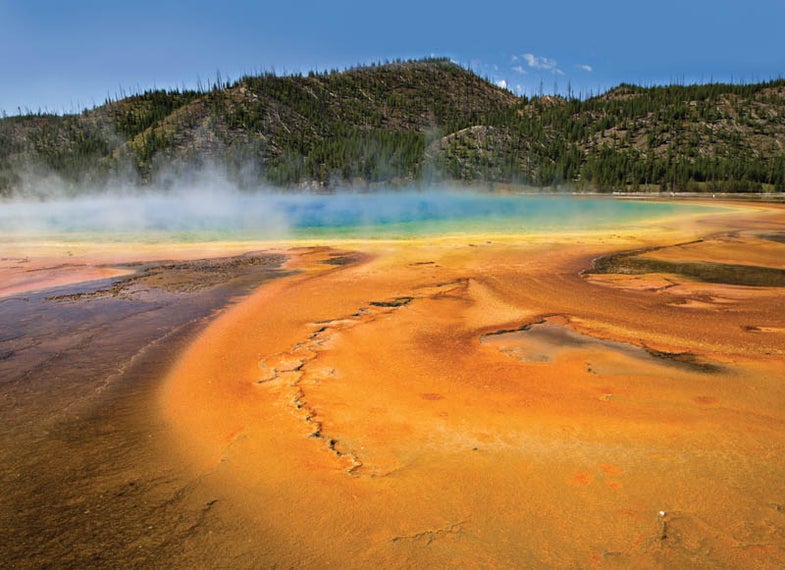
Now go to the Detail tab. Although JPEG sharpening happens in the camera, RAW files need sharpening applied during conversion. ACR automatically adds a little sharpening—adjust it as needed. The program also does a little noise reduction by default. Images like this one, shot at ISO 100 in bright daylight, typically need no noise reduction, so it’s turned off here.
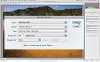
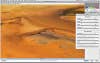
To choose the settings with which you’ll open your file, click on the link running along the bottom of the screen: it will bring up a dialogue box. Because you want to create the highest quality file possible, with the most information contained in it, choose the ProPhoto RGB color space, a bit depth of 16 Bits/Channel, and your camera’s maximum megapixel amount. Click OK. Then hit the Open Image button to bring the file into Photoshop.
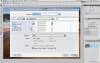
Now save your file—this will be your master file. Go to File > Save As, and choose Format: TIFF. The default TIFF options are fine. Do all of your image editing and retouching, and continue to save as you work.
When you want to print or share your file, prep your master file first. For printing, resize it to the print size and then sharpen. For e-mailing, shrink it and then sharpen. Finally, before you e-mail, change the color space to sRGB by going to Edit > Convert to Profile. Choose sRGB as your Destination Space and click OK.