21 tips for better flash photography
These simple lighting tips and techniques will help you take your lighting to the next level.
We maintain that the single most important accessory for your DSLR is a full-featured TTL flash unit. With “lightning in a bottle,” you can freeze action solid, mimic studio lighting, tame harsh midday sunlight, balance (or unbalance) the color in a scene, and produce wild and weird effects—with no software required. Here we present a primer on portable flash theory and practice.
Don’t fear “unnatural” fill. For example, a 2-stop ambient underexposure combined with full flash exposure can dramatically isolate a human figure or foreground object.

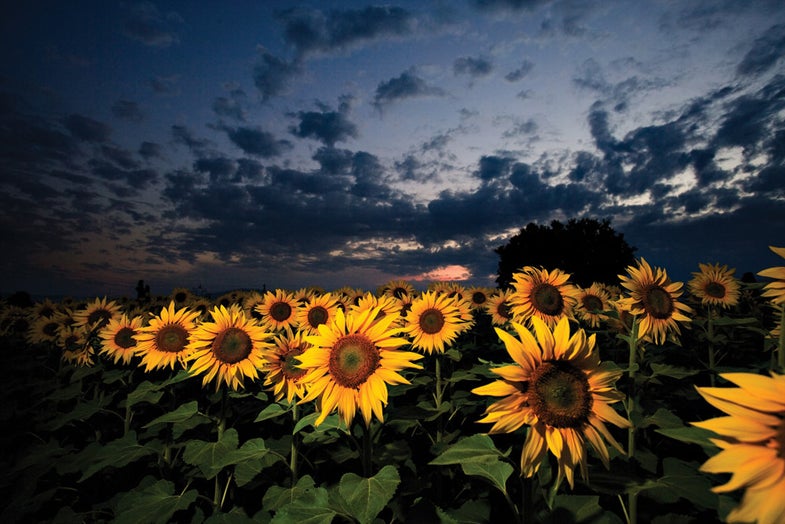
All flash photos are double exposures
The two exposures occur simultaneously, one by the ambient light, the other by the flash illumination. You can vary each of the exposures for a wide variety of different effects: You can make them of equal brightness, a little unequal, or widely unequal; you can give them different color balances; you can even vary shutter effects, with one exposure motion-blurred and the other tack-sharp. This is what makes flash photography so much fun—and so supremely useful.

Experiment! If you’re shooting, say, a foreground subject against a sunset or leafy background, don’t settle for the auto settings. Vary both the ambient and flash exposure to see different effects.

Shutter speed affects ambient but not flash exposure. The flash is a very brief burst occurring during the relatively longer duration of the shutter opening—a flash burst of 1/2000 sec will provide the same illumination with a shutter speed of 1/30 sec as it will with a 1/250 sec shutter. So you can lighten or darken the ambient exposure by increasing or reducing the shutter speed while maintaining the same aperture—and thus the same flash output.

Shot with a single snooted light-source placed directly behind the bread, the odd nature of the set-up required much trial and error to get the exposure just right.
You can vary the shutter speed and still use autoexposure by setting the camera to aperture-priority mode. Now, when you darken or brighten with exposure compensation, the camera will vary the shutter speed but keep the aperture the same.

Adjusting the aperture affects both ambient and flash exposure
As the aperture is the lens’s light valve, opening it up or stopping it down will lighten or darken both exposures—provided the flash output is kept at the same level. (With the flash set to auto, it will compensate by increasing or reducing the output—more on this later.) Since a large aperture admits a lot of light, the flash can emit less for proper exposure. This will give you greater flash reach and/or longer battery life. A small aperture requires more light, and your reach and/or battery will suffer accordingly.

Using a wide aperture to limit depth of field in an outdoor portrait? In bright light, this may force you to exceed your camera’s maximum sync speed. Solution: a neutral-density (ND) filter to reduce the light entering the lens. A 6-stop (ND 1.8) filter will let you drop to 1/250 sec from 1/8000 sec, although optical viewing will be dim and autofocus dicey.

For natural-looking fill flash, underexpose the flash exposure
The idea behind natural fill is to make it look like soft ambient light. As fill flash is ordinarily used for back- or sidelit subjects, setting the flash illumination to the same level as the ambient light makes your strobe obvious. To keep it subtle, use the flash’s exposure compensation to dial down its output. Settings in a range of –0.7 to –2 EV usually work well.

Flash has color
While we think of flash as white light, flash, like all visible light, has a color cast. Accessory flash manufacturers set “daylight balance” at around 5200–5500 degrees Kelvin in color temperature. This is actually a good deal warmer in color than daylight on a blue-sky day, when color temperature can go as high as 10,000 degrees K (very blue), leading to a mismatch in color balance. This is why digital cameras have separate presets for flash and daylight white balance.
A more common mismatch: flash with tungsten room light. With a digital camera set to flash white balance, the foreground subject will appear a neutral color while background illumination out of the range of the flash will have a yellow-red cast. (Many photographers like this look and set it up deliberately.) Flip the camera’s white balance to tungsten, and the background light will shift to neutral while the foreground subject appears very blue. Want to even the balance? Put an amber filter over the flash lens, and set the camera to tungsten or auto white balance.

Shooting daylight film under fluorescent lights, you would put a green gel (CC 30) over the flash head to balance it with the greenish fluorescents. You’d then place a magenta filter (such as the Tiffen FL-D) over the camera lens to neutralize the now-overall green cast.

Autoflash varies the duration of the flash
Modern accessory flash units automate exposure by reading the bounce back of the flash through the lens (TTL). (Many units now make this reading via a brief preflash.) The camera/flash brain adjusts the flash exposure by making the burst shorter or longer for less or more light, respectively. The range of flash bursts is pretty astounding—a typical accessory unit may have durations from 1/1000 sec to 1/50,000 sec or even less. You also adjust manual flash power by changing duration, almost always measured in fractions: full power, 1/2, 1/4, 1/8, etc., often down to 1/64 power for the shortest flash duration.

Use very brief flash durations for extreme motion-stopping photos. Positioning the flash close to your subject, using a wide aperture, and setting a high ISO will all shorten the duration of autoflash, and you can dial in high speed manually, too. Keep the ambient light and/or ambient exposure low, though, or you might just capture a ghost—the term for ambient motion blur in a flash shot.

TTL flash works better with the camera in manual exposure mode
By setting the ambient exposure you want manually, you eliminate one variable and can concentrate on the effects of various flash exposures, positions, etc. Say you’re shooting a series of portraits outdoors with fill flash. You want an ambient exposure that keeps the background at a certain light level, but with the camera set to auto, it might keep adjusting this exposure as you change position, focal length, or flash output. Better to lock it in using manual mode.

With fill flash in a backlit situation, it’s often better to set the ambient exposure 1 stop or a little more over the meter reading. This makes the backlighting appear more realistic. With portraits, it also helps to obscure background detail.

Flash follows the same hardness/softness rules as ambient light
The broader the light source, the softer the light. That’s why studio portraits shooters use softboxes, umbrellas, and beauty dishes on their strobes. But the narrower the light source, the harder the light. So studio shooters use snoots and grids to get hard, even harsh, effects. Placing the light source closer to your subject makes it broader and therefore softer; moving the light source farther away makes it narrower and harder. Read all about the qualities of light in “10 Things You Must Know About Light“.

Numerous light-modifying devices are made for shoe-mount flash, as well as accessories for adapting shoe-mounters to studio gear such as stands, umbrellas, and so forth. Click here for a list of some of our favorites.

Flash falls off in proportion to the square of the distance
The beam from a flash unit is cone-shaped—shoot a relatively close object and most, if not all, of the light cone will cover it. As you move farther away, though, a smaller portion of the light cone hits the subject, as more of the light sprays wide. At a great enough distance, the flash’s light becomes imperceptible to the eye as well as to a sensor or film. And it’s a square relationship: If you move twice as far away from your subject, you get only 1/4 the illumination on the subject; triple your distance, and you get only 1/9 the light. Setting the zoom head of an accessory flash to tele position will create a narrower cone, but you lose wide-angle coverage. Yet just because you’re far from your subject doesn’t mean your flash has to be. You can position an accessory unit close to your subject and fire from a distance via a wireless trigger.

Changing the shooting angle allowed for the singer and the fans directly in front of him to be isolated.
Use flash falloff to your advantage by varying the distance between your subject and the background. If you want to darken a wall behind your subject, simply have your subject move farther away from the wall.

For exact control over a multiflash setup, switch them to manual
Sure, the major TTL flash systems can operate fully automatically with multiple units, and you can vary their output either through the camera or a single wireless controller. But this is often more complication than it’s worth, and with digital, it’s pretty easy to adjust multiple lights using the manual fractional power controls.
A quick starting point for a classic three-light setup would be to set the main, fill, and background (or rim) lights all at 1/4 power, then take test shots to determine the proper aperture. From there, you can adjust each flash individually—e.g., upping the power of the main for brighter highlights, lowering the fill for greater separation.

A flashmeter was used to keep the overall exposure in check.
For elaborate flash setups and studio photography, a flashmeter proves very useful. It not only provides exposure readings, but also can determine the relative proportion of individual flashes in the setup and make readings of multi-pop exposures. Some also allow narrow spot flashmetering. And they can be switched over to ambient readings, too, for balancing exposures.

With AA batteries, there is no free lunch: The batteries that give you the shortest recycling times, NiMH rechargeables, give you the fewest shots per charge; the ones that give you the most shots, disposable lithiums, have the longest recycling times. Alkaline AAs land in between.