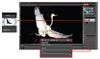
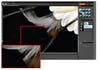
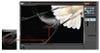
After we awarded Cheryl Molennor’s photo of an egret against a black background 1st Place in our October 2009 Your Best Shot competition, we got a rush of letters. So many of our readers wanted to know how she got the background in her image that we decided to find out, and asked Molennor if we could use another of her egret photographs to teach her technique. When she shoots a white bird, Molennor exposes it to preserve its highlights and allows the background to go dark. Then she uses a combination of selections, Curves, and dodging and burning in Adobe Photoshop CS3 to make the background appear black. But, since we want as many of you as possible to try it at home, here’s a Photoshop Elementsbased technique that will achieve the same result. It’ll work in Photoshop CS3 or CS4, too. Step 1 To darken the background but leave the subject alone, we’ll have to begin by making a selection of the bird. We’ll use the Quick Selection tool to do this. Type the A key to get the tool. Then start painting on the bird until it is nearly all selected. This first go-round is rough, so don’t worry about doing it perfectly. Note: For more details and tips on making selections using the Quick Selection tool, especially in Photoshop, revisit September 2009’s “Digital Toolbox.”Step 2 Now zoom in to the edges of the subject and start honing your selection. Stay in the Quick Selection tool, and hold down the Alt (Option on a Mac) key to get the Subtract from Selection tool. This time, paint in areas where you want to remove the selection. If you need a smaller brush, tap the left bracket key ([) on your keyboard. To make it bigger, tap the right bracket (]). In this case, the most difficult parts to get with the Quick Selection tool are the bird’s feet and wispy feathers. We’ll fix those later, so just do the best you can in this step. Note__: Photoshop CS3 or CS4 users frustrated with the Quick Selection tool in Step 2 have other options: Try typing Q to head into Quick Mask mode, and use your Brush tool to paint in your selection.Step 3 Now that you have a good selection, go to Select > Inverse, switching it from enclosing the subject to enclosing everything else—that is, the background. Create a Brightness/Contrast Adjustment Layer by going to Layer > New Adjustment Layer > Brightness/Contrast. This makes a mask in the shape of your selection, so your adjustments will apply only to the background. Then bring the Brightness down and Contrast up until the background goes black. Note: If Brightness /Contrast doesn’t make your background dark enough, try using a Levels Adjustment Layer instead.Step 4 You’ll immediately see where your selection looks good and where it doesn’t. Delicate feathers are hard to select with the blunt force of the Quick Selection tool. and since they should look as if they are against black, any color from the original background looks glaringly fake. To fix it, right-click on the Background Layer and choose Duplicate Layer. Then hit o on your keyboard to get the Sponge tool. In the options bar, choose Mode: Desaturate, and Flow: 100%. Zoom in, and with a large brush, paint away the distracting color. Note: If you accidentally desaturate your bird, go to the Options Bar and choose Saturate to bring back the color.Final Step Getting rid of errant color helps, but it doesn’t solve the problem of having a hard edge around soft feathers. So click on your mask again and hit B to get the Brush tool. In the options Bar, set the opacity to 50%. Set your foreground color to black (hit D, then X on your keyboard to do so), then paint on the feathery areas to bring them back in. If you go too far, hit X to switch to painting with white, and repaint to cover up your mistakes. Note: When you’re making your final adjustments to the feathers, don’t spend too much time zoomed in beyond 100%. Sure, it’s easier to work very closely, but you may not be able to make out such fine details in your final print.F.Y.I. Elements vs. Photoshop: you may wonder what the difference is. Why spend money on Photoshop CS4 when Elements seems perfectly fine? The technique we used here highlights elements’ constraints. Photoshop users have three or four more agile selection methods at their disposal. Photoshop also offers more options for darkening the background or eliminating excess edge color using a wider variety of Adjustment layer types. Finally, Photoshop users can add masks to normal layers, and can also choose to isolate the bird by simply masking off the background itself.