Photoshop Elements: Beyond The Basic Fixes
It’s time to try some more sophisticated tools.
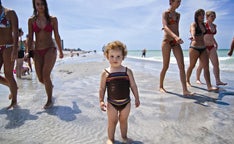
*Photo Courtesy of Angela Georges
Last month we showed you how to use Adobe Photoshop Elements to improve an image by cropping, fixing contrast, and improving color. Once you’ve taken those first steps, it’s time to try some more sophisticated tools. This time, we’ll fix an image that has sensor-dust spots, washed-out highlights, and, in some specific areas, too little contrast.
1. Fixing this image requires working with layers.
The first is always called the Background Layer. Duplicate it so you can always go back to where you began. Go to Layer > Duplicate Layer, and click OK. If your image is 16-bit, convert it down to 8-bit to work with Layers in Elements.
2. There was a dust spot on this sensor, and unfortunately it landed right on top of the little girl’s lip.
To get rid of this blip, zoom in. Type the J key to get the Spot Healing Brush. Tap the left bracket key ([) on your keyboard to shrink your brush circle, and the right bracket key (]) if you need to make it bigger. When your brush is the right size, click on the spot you want to remove and watch it disappear.
3. Now type Ctrl + 0 to see your whole image fit on your screen.
Since you want to retain the work you did on this layer but don’t want to be wedded to your next fix, duplicate your Background Copy layer using the same method as in Step 1. Then go to Enhance > Adjust Lighting > Shadows/Highlights.
4. Shadow /Highlight defaults to a 25% lightening of the shadows.
Override this by dialing the Shadow slider down to 0%, and move the Darken Highlights slider to the right until the blue of the sky deepens. Then adjust the shadows by moving the Shadows slider rightward until you get a hint of brightness. Beware: Moving both sliders too far creates ugly halos around subjects. Click OK when you like what you see.
5. More brightness and contrast on the child’s face will help draw attention.
Start by making a Levels Adjustment Layer: Go to Layer > New Adjustment Layer > Levels, and click OK. Adjustment Layers affect all the layers below, and you can return to tweak them later. They are also the only way in Elements to use Masks, which allow you to fix just part of your image.
6. In the levels dialogue, move the black and white triangles until the girl’s face looks brighter and a little more contrasty.
Don’t worry if the rest of the photo doesn’t look so good-we’ll get to that soon. Then click OK.
7. The white rectangle in your Adjustment Layer is your Mask (circled).
Elements selects it for you. Type D, then Ctrl + Backspace, filling it with black. Now type B to get the Brush tool, and paint with white on the girl’s face. That will reveal the brightness and contrast changes you made in your Adjustment Layer. If you reveal too much, paint with black to cover it up.
After Shot