Editorial: Guilty Pleasures
When it comes to making panoramas, who knew free software could be so much fun?
How much of the software that comes bundled with your camera, printer, scanner, or computer do ever actually use? Oh sure, you load the RAW converter for the camera, and the drivers for the printer or scanner; maybe even that version of Adobe Photoshop Elements or Corel Paint Shop Pro, since either program allows all but the most serious image editor to stave off a full — and expensive — commitment to Photoshop CS2. But the other stuff? Those disks are probably shunted to a drawer with the owner’s manual.
But these days, even a lowly point-and-shoot is likely to come with software that’s surprising, useful, and fun.
Take, for instance, ArcSoft’s Panorama Maker 4. One of several zillion panorama programs that you can get for little or no money, it retails for $28 (street). But you could find it or something like it in the box when you open your new camera or printer. And if it’s not there, download a free trial version at www.arcsoft.com.
While purists will scoff, putting this sort of program in the same category as inkjet greeting cards and scrapbook pages, I defy any photographer to not have a blast playing with panorama software. Especially since it’s typically plug-and-play simple.
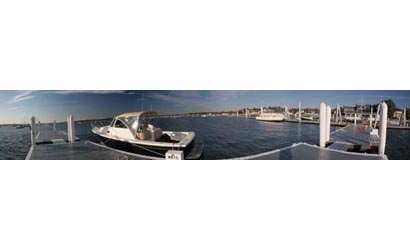
Here’s the process for Panorama Maker 4: Load it into your computer. Shoot a series of photos that you want to stitch together either vertically or horizontally (as I’ve done here), following the guidelines below. You can stitch up to 16 photos and go as wide as you want — even all the way around in a 360-degree panorama. Load your photos into the program as RAW or JPEG files; tell the software if it got the order of the images right (if not, drag them into the correct sequence), and press “Stitch.”
Seconds later, the many photos are one. If cropping or horizon straightening is required, it’s easily done. Then print it out on any media your printer can handle — from snapshot-sized paper to roll stock, or even a series of 8.5×11-inch sheets that can be joined together to form a mega-panorama.
So go ahead, pop some of those offbeat disks into your computer and see what kind of fun you can have. The “serious” software can wait.
7 Pointers for Panoramas
Shooting a series of photos to build a panorama is easy. Just follow these seven tips from ArcSoft:
1) Turn off autoexposure. Shoot in manual mode.
Otherwise, when the camera automatically adjusts the exposure for each shot, subtle changes in light can make the corresponding area of two overlapping photos look totally different.
2) Turn off auto white balance. Set it manually so that the white balance doesn’t change from shot to shot.
3) Use one exposure setting. Find a shutter speed/aperture combination that works for the entire range of shots. Panoramas stitch better in more even light.
4) Use one focal length. All the photos in the sequence should have the same point of view.
5) Shut off the flash. Otherwise, there’ll be inconsistencies between shots.
6) Use a tripod. Not essential, but it helps keep the camera on the same plane throughout all of the shots. And when shooting 360-degree panoramas, a tripod ensures that the first and the last shots line up with each other. If your tripod has a level, use it.
7) Overlap the shots. Shoot the photos using between 25 percent and 50 percent overlap. You can estimate; the amount of overlap doesn’t have to be the same from shot to shot. The wider the lens, the more you should overlap to avoid distortion.